| Glossary of Engraving Part 2 - Terms and Methods |
 BULINO ENGRAVING: fine detail engraving by means
of a small graver using hand force to produce micro lines or micro dots.
BULINO ENGRAVING: fine detail engraving by means
of a small graver using hand force to produce micro lines or micro dots.
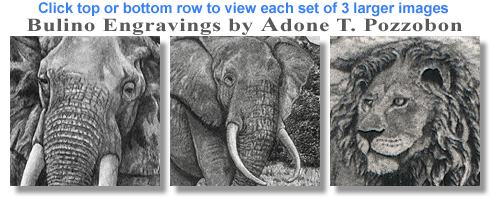
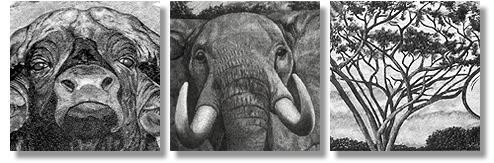
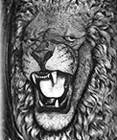
BULINO DOT ENGRAVING: A means of producing high definition images by means of micro dots, created by pressing a tool tip of specific shape into metal. A small barb of metal is raised. Some remove this and others retain it. Each produces its own specific effect but the principal goal is to create a shadow. Tool shape, size, and depth determine dot characteristics that control tone density. The portion of an image that contains the most detail are the middle grays where highlight and shadow tones mix to produce various visible densities resulting in the widest range of tone variance in image. Think of it like a neutral gray where all levels of dark and white are visible against it. The darkest areas are called shadow tones, the brightest areas are called the highlights tones and together the two extremes control contrast. On a sixteen step photographic Gray scale or densitometer reading a standard black and white photograph will show at least eight density steps of gray from lighter to darker and these fall in that middle range, the Midtones. The Shadow tones consist of at three or four visible steps of density change as do the brightest areas called the Highlight tones. The rest of the range is either too dark or too light for our eyes to effectively detect such subtle tonal changes. Creating multiple tones in metal is not like shading an image on paper and certainly not like a photograph whose intensity may be adjusted after exposure. In metal deal with a permanent alteration to the surface that creates density changes controlled by the intensity and concentration of dots, their size and depth. The bulino technique is capable of reproducing near photo realism on metal. Bulino dotting is a painstaking long process and one of the most expensive techniques. It also is one of the most delicate types of engraving easily prone to damage if mishandled. Therefore it should be applied to items that are least likely to be handled regularly.
ABOUT BULINO DOT ENGRAVING: Bulino can be enormously time consuming. On one commission, by hand graver I laid in as many as 2 million dots on each of three scenes that were 3" x 2 1/2" spending a total 637 hours in dotting five elephants and landscapes, with an additional three hundred hours for the balance of the vine leaf motifs in relief on a .600 English double rifle. This did not include design time or the original miniature digital paintings created for these scenes. Which areas to dot, or line, and when to do so lightly or heavily define individual technique and style. Bulino as a topic cannot be lumped into a simple correct or incorrect ideology. High definition bulino engravings can be achieved using any of the standard graver types currently found on the engravers bench. The most important thing to familiarize yourself with is the material you are working on. It is important beforehand to have a firm understanding of that material's characteristics relative to tool resistance i.e. hardness and its reflectivity levels. If the metal is excessively bright you will need to add ink or other means to increase density. It is not necessary to fill bulino work with any inks all the time. It is dependant on style and of the desired result and or metal circumstances such as shape. All things have a price, adding inks removes natural shadows and sparkle of highlights from the work but at the same time offers optimum contrasts and wider viewing angle. Without inks bulino dot scenes have a limited angle of view 15°-20° before contrast is diminished. The gain of natural shadow is smooth gentle tones producing more natural dark to light graduations that better mimic realism. Inks insure that tone density remains visible on most viewing angles by filling the dots with ink. In some instances it is absolutely necessary to add inks such as with curved objects otherwise the continual change of light striking the metal at different angles makes it impossible to see the image properly. Bulino is most effective without ink on flat surfaces made of metals that are not highly reflective. There are no absolute right and wrong methods, the end result and the satisfaction of the customer are the defining factors. Those new to bulino dot engraving often think that deep large dots are the only way to achieve darkness. And while to some degree this can have advantage particularly when adding ink fills, it is not the case when fills are not used. Dot density makes a big difference as does the barb size raised if keeping it. The barb casts a micro shadow, that if removed will alter tone density and is therefore is a factor in ones technique. If retaining the barbs then the engraver should realize beforehand that dotting must be unidirectional otherwise there will be a significant density change. To maintain tonal density in a given area all barbs must face the same direction otherwise their angles will alter how its shadow and can cause the backside of the barb to reflect light. By the same measure the experienced bulino engraver can take advantage of this by making subtle alterations in dot direction to further control tonal change. If using ink fills than dot direction is less critical. Bulino dot or line engraving requires a certain amount of artistic ability or at the very least that one begins to study the fundamentals of design. The ability to draw well and to understand design its vanishing points, perspective, composition, light to dark contrast (Chiaroscuro), and basic anatomy are crucial to learn. There is no redo so it has to be correct first time. Expect that the scenes required will not exist and must be created from scratch. Your art skills will require you to redesign reference materials often changing lighting directions, shadows, perspective... and these elements of design will be critical in order to represent images realistically. Images in books or on the internet are not ours to do as we please with! They are another's intellectual property and using their work as our own is an infringement on that artist's copyrights and illegal. While there are instances that cannot be avoided like using an animal, or using an image of car or building... it is preferable that small alterations are made in as many areas as possible to make it notably your own or to contact the artist if possible and ask for permission.
RELIEF ENGRAVING: This method involves the removal of material in order to create a raised effect. The process requires engraving the outline of a design followed by the slow process of cutting away and levelling the interior and or exterior portions to a desired elevation from its lowered background. The background can be filled with ink for high contrast or can be treated by line, dot, punched also called stippled, or beaded effect. STIPPLE PUNCHED BACKGROUND: This is the fastest and easiest background treatment. All that is required is a fine punch with a slightly rounded tip. The result is a series of concave divots or dimples creating a textured backdrop. This method requires little precision. Its purpose is to aid in levelling backgrounds, and rapidly creating contrast. BEADED PUNCHED BACKGROUND: This method produces a pretty pattern of raised mini domes but requires a punch whose tip has a concave depression that creates a raised dome when impacted on. This method requires far more precision to do well in order to maintain visual uniformity particularly over larger areas where minor deviations of uniformity will appear as defects. DOTTED BACKGROUND: This is basically a bulino dot background where the objective is a dark contrast. This approach takes the longest of all methods but can produce silky smooth backdrops dependant on technique and tool. LINED BACKGROUNDS: This method entails cutting a series of micro lines as evenly spaced as possible and as close to the same depth as possible producing a directional pattern of lines. This method is most commonly seen as vertical lines on many traditionally decorative antique painting frames where its raised motifs are elevated from a backdrop of vertical lines called a Venetian background stemming from a Venetian blind effect. LINERS AND SHADING: The liner tool is essentially the same as a flat graver with one major difference; its edge has a series of fine lines grooved along the entire length of the graver bottom. Liners come in a variety of sizes and line spacing and are generally marked with two sets of numbers, one defines the width of each line its thickness and the other defines the spacing between the lines. This tool is designed to make a series of uniform cuts but is generally to fine for Venetian effects. It is used mainly for shading purposes where exact spaced line patterns are required. It is most effectively used in Western style engraving where it is stunningly applied. The straight liner is mainly used on curved objects and curved liners mainly used on flat objects. This tool is designed to create specific patterns or to achieve a certain desired effect and does not replace single line shading
|
 BULINO LINE CUTTING: At times this form of light line cutting is referred to as Banknote engraving or Woodcut engraving because it was typically used where intricate detail was needed such as in Banknotes or other documents with elaborate designs. It was also used extensively for copper plate and woodcut for printing lithographs. The process is simple, a hand held graver producing micro lines closely packed together in order to produce tonal density changes.
 RAISED INLAY: Inlay is the means of inserting precious metals such as Silver, Gold, Platinum, into a base material such as steel. The process involves cutting out the pattern from the base material in the exact shape as that of the image being inlaid. The depth of the cut-out or pocket as it is often termed is relative to the thickness of the material being inlaid and should be approximately half as thick.
 MIXED TECHNIQUES
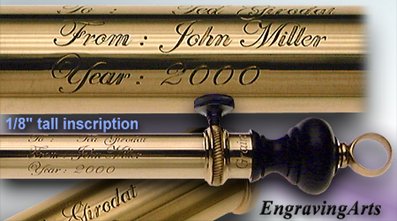 LETTERING:This is a subject that is understated and under appreciated. Because lettering is such a common element of everyday life its precision goes unnoticed. The ability to letter well is one of the most difficult aspects of engraving. There is little tolerance when lettering, it demands perfect form under most font styles. Letter alignment is critical and any defect stands out. Script lettering is the most forgiving because it lacks a rigid structure incorporating sweeping thick and thin parts of each letter.
Rings | Home | Galleries | Site Index | Artist Bio | Contact
All content Copyright © Adone Galleries - EngravingArts