| Glossary of Engraving Part 3 - Digital Design |
|
Much can be said in regards to art design from a creative standpoint but the engraver should be aware that creativity is not enough. It is necessary to have firm understanding of the type of designs traditionally used for the particular medium being engraved. Traditional engraving styles form the foundation that allows the artist the ability to best express their creative idea while remaining true to root tradition. This does not mean there are no exceptions, but rather that sooner or later you will be required to produce some of these standards or lose commissions, the exception being a truly unique style that attracts a steady flow of work. The majority of commissions that allow artistic freedom are given to well seasoned engravers who are usually well versed with the classics. With considerable experience a well versed engraving artist is fully capable of creating a design directly onto the medium. However, considering the complexity of many designs and the wonderful benefits of digital design the practical approach is digital. Understanding & appreciating digital design: Digital art does not replace the skills required by an artist it simplifies mundane tasks and frees one from finality allowing the artist to revert to any previous point prior to certain alterations. Hand drawing still takes place just as before, the pencil becomes a digital pen and the paper a digital tablet. In the hands of experienced designers digital tools serve to enhance the artistic palette and increase flexibility allowing versatility in manipulating the artwork broadening the creative process. The digital tools allow the design to be scanned in from paper or drawn directly to an on screen canvas of predetermined size. The most basic tools allow erasing, cutting, reversing, stretching, inverting, warping duplicating, and overlaying of images, and these form a small number of available editing options. In digital design changes are made without the risk of destroying the original. If drawing on paper then the image is scanned and imported into any image editing software such as Adobe Photoshop or equivalent programs. If equipped with a digital drawing tablet such as a 'Wacom tablet' then one draws directly to screen bypassing paper. 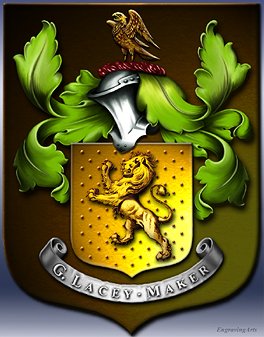 The basic advantages of digital design is that any segment of a design may be extracted and modified for reuse in another part. Designs are drawn on transparent layers that are the same idea is drawing different portions of a design on separate panes of glass and then staking them. Each portion is free to be moved around in its respective transparency and manipulated independently from all others or in unison with any which are highlighted to follow the same action applied.
The Coat of Arms was completely designed and painted using Photoshop No special effects were generated, a Wacom tablet was used and the image was entirely air-brushed by hand. The original was painted at 3 times this size and considerably more defined in detail and took approximately 35 hours to complete. The initial step was to draw a clean outline and use it as a boundary guideline for air-brushing. The next step was to begin painting solid colors. Next shadow and highlight tones were roughly brushed in place, then manual blending and smoothing until the desired result was achieved. All main design elements were painted on separate layers. The final step was to adjust colors, intensity, and discard all unwanted layers. What is the downside to digital: The assumption that digital art speeds the design process is under most circumstances false. Since most engravers create original work then the only gain is in repeatable small motifs that could be modified as a starting point of another design. Creativity demands trial and error and any tool that grants the artist more visual options in all likelihood will motivate exploration and will slowdown the design stage. Learning to use professional graphics software such as Photoshop will be time consuming, you will not be able to simply start up the software for the first time and begin drawing an engraving project. You will need to first learn how to scale your canvas to the correct size and pixel count that will allow the correct scale ratio to be applied upon printout. You will need to get an outline of the item to be engraved onto that canvas. You will need a scanner of sorts, a laser printer preferable but an inkjet will suffice, and a graphics tablet is a must as you will not be able to draw and edit using a mouse. Professional software is expensive and can be a royal pain when things don't run as intended. General tools in graphic design software?: Configurable tools are: brushes and pens, rulers, grids, line making tools, pressure sensitivity settings, color palettes, erasers, blending tools, Lasso and Marquee editing snipping tools that cut move or modify any segment of the artwork, layers and endless duplication, History undo/redo configurable to desired amount, stretch, twist, rotate, size, distort, liquefy, perspective, skew, scan edit photos and crop unwanted areas, magnification and much more... Flexibility is the benefit, it can however require a long learning curve to fully take advantage of the many feature digital design and editing offers. The one good thing about all this is that for engraving design purposes we are dealing mainly in black an white and generally as line work, this reduces the learning curve needed in order to create great usable artwork. |
Rings | Home | Galleries | Site Index | Artist Bio | Contact
All content Copyright © Adone Galleries - EngravingArts